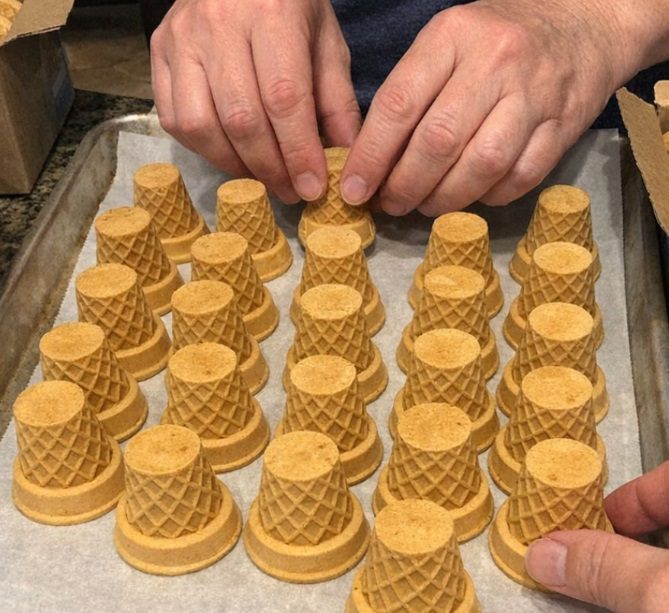
Flip 24 ice cream cones upside down, and the end result is precious
DIY Mini Christmas Tree Village Made from Sugar Cones
Some holiday crafts have a way of turning ordinary supplies into something surprisingly charming, and these little sugar cone Christmas trees are a perfect example. By turning simple cones upside down, you get the shape of a miniature evergreen without needing to build anything from scratch. A little paint, some glitter, and a handful of tiny decorations are all it takes to transform them into a festive display.
I love this project because it looks lovely without requiring expensive materials or complicated steps. With two boxes of sugar cones, you can create an entire miniature forest for a mantel, a holiday centerpiece, or a cozy corner of your home. The secret to making the display look especially pretty is mixing the finishes: deep green trees, natural brown cones, and snowy white tips give the arrangement a warm, layered appearance.
You can make each tree slightly different with colorful pom-poms, gold beads, or tiny star toppers. Whether you prefer a rustic farmhouse Christmas or a more traditional holiday look, this simple craft is easy to customize and fun to arrange once all the little trees are finished.
Materials
- 24 standard-size sugar ice cream cones, plus 2–4 extra for breakage
- 3 fl oz deep green acrylic craft paint
- 2 fl oz white acrylic craft paint
- 1 fl oz metallic gold acrylic craft paint, optional
- 1/2 cup fine iridescent or clear glitter
- 72–96 mini pom-poms, 1/4 inch, in red, white, blush, gold, or silver
- 24 gold beads, 6–8 mm, or 24 mini star toppers, 1/2 inch wide
- 8–10 full-size hot glue sticks
- 1 sheet parchment paper, approximately 12 × 16 inches
- 1 foam brush, 1 inch wide
- 2 small round paintbrushes
- 1 low-temperature hot glue gun
- 1 large tray or baking sheet
- 2 cups faux snow, cotton batting, or white batting
- 1 cake stand or a 36–48-inch mantel space for displaying the finished village
Instructions
- Prepare your workspace. Cover a tray or work surface with parchment paper and arrange the sugar cones upside down in loose rows. Handle them gently because sugar cones can crack easily. Working with six to eight cones at a time makes painting and decorating more manageable.
- Divide the cones into three groups. Set aside eight cones for deep green paint, eight to remain mostly natural brown, and eight for snowy white tips. This combination of finishes gives the finished village a more natural, decorative appearance.
- Paint the green trees. Use the foam brush to cover the first eight cones with deep green acrylic paint. Apply light strokes from top to bottom, taking care not to press too hard against the delicate waffle texture. Allow a little of the cone’s pattern to remain visible for added detail.
- Add glitter to the green cones. While the paint is still slightly tacky, sprinkle fine glitter over the painted surfaces. Gently tap off any excess and place the cones upright on their wide openings to dry.
- Decorate the natural brown trees. Leave the next eight cones unpainted, then use a dry brush to apply a small amount of white paint along selected ridges and edges. This subtle snowy effect adds variety while allowing the original brown color to show through.
- Create the snowy trees. Brush white paint over the top third of each of the remaining eight cones, then lightly feather the paint downward to resemble fresh snow. Sprinkle glitter over the wet paint and let the cones dry.
- Allow the paint to dry completely. Leave all the cones undisturbed for approximately 20–30 minutes, or follow the drying time on your paint label. Set aside any cracked or damaged cones rather than throwing them away; smaller pieces can sometimes be used as decorative tree stumps.
- Add the miniature ornaments. Use the hot glue gun to attach three or four mini pom-poms to each tree, pressing them gently into the cone’s ridges. Keep the natural brown trees more lightly decorated and add a few extra ornaments to the green ones for a balanced look.
- Attach the tree toppers. Glue one gold bead or mini star to the pointed end of each cone. The small topper adds a traditional Christmas detail and helps give each miniature tree a finished appearance.
- Add a little extra snow. For more dimension, dab white paint onto a few lower ridges of selected trees and sprinkle on a little additional glitter. Vary the amount of decoration from tree to tree to keep the forest from looking too uniform.
- Arrange the miniature forest. Group the trees by height and color, placing shorter or slightly chipped cones toward the front. You can arrange them in a graduated line along a mantel or create a circular display around a cake stand.
- Finish the display. Spread faux snow or white batting around the bases of the trees, arranging it between the cones to create a snowy woodland scene. Add any decorative stumps, then adjust the green, brown, and white trees until the arrangement looks balanced.
Variations & Tips
- Make an edible version for kids. Instead of acrylic paint and hot glue, use frosting and small edible candies to decorate the cones. This creates a fun holiday activity for children. Keep the edible version separate from the painted decorations, which are not suitable for eating.
- Mix the colors for a natural look. Although painting every cone green might seem easier, combining green, brown, and snowy white finishes creates a more interesting display. The different textures and shades make the miniature forest look fuller.
- Save broken cones. Sugar cones are delicate, so a few may crack during the project. Trim damaged pieces carefully and use them as small decorative stumps, adding a touch of white or gold paint if desired.
- Keep glitter under control. Sprinkle glitter while the paint is still tacky so it adheres without requiring an additional layer of adhesive. Working over parchment paper also makes it easier to collect and reuse the excess glitter.
- Choose your favorite toppers. Gold beads create a simple, understated finish, while miniature stars give the trees a more traditional Christmas appearance. Both options work well with the mixed-color design.
- Try different display arrangements. For a mantel, position the tallest trees at one end and gradually decrease their height toward the other. For a centerpiece, arrange the trees closely together around a cake stand and add faux snow to create a miniature winter village.
- Store the trees carefully. Once completely dry, place the decorations in a shallow box with tissue paper between the layers. Store them in a cool, dry location away from moisture and excessive pressure to help prevent the cones from cracking or losing their shape.
Final Thoughts
These mini Christmas trees made from sugar cones are a lovely reminder that holiday decorating doesn’t have to be complicated or expensive. With a few basic craft supplies and a little creativity, you can create a miniature forest that looks beautiful on a mantel, shelf, or holiday table.
The best part is that every tree can have its own personality. Some can sparkle in deep green, others can keep their natural brown color, and a few can wear snowy white tips. Arrange them together with faux snow and tiny ornaments, and you’ll have a charming Christmas village ready to enjoy throughout the season.