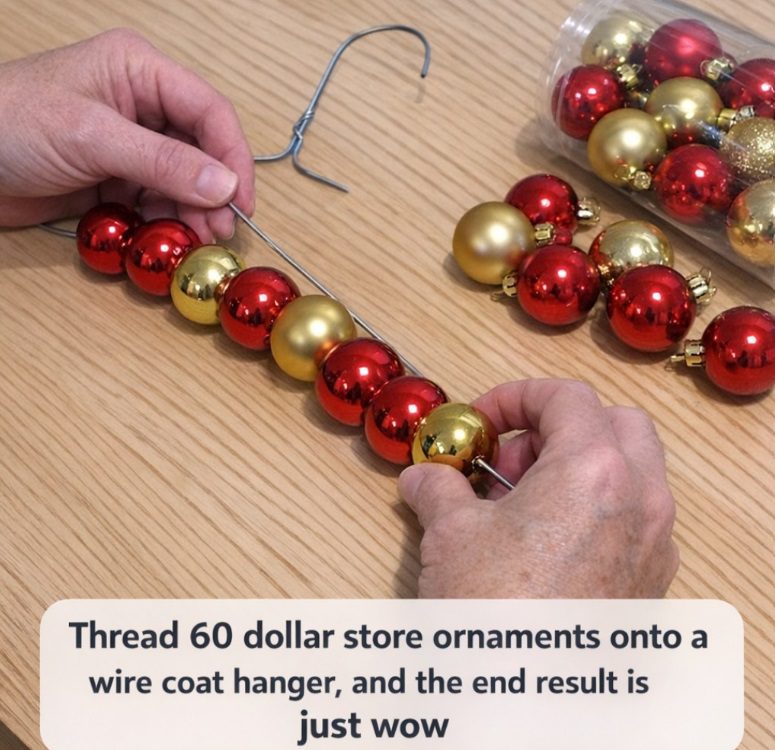
Thread 60 dollar store ornaments onto a wire coat hanger, and the end result is just wow
DIY Christmas Ornament Wreath Using a Wire Coat Hanger
A full Christmas wreath can make a front door feel festive without spending a lot on store-bought decorations. This simple DIY project uses a wire coat hanger, colorful plastic ornaments, and ribbon to create a bright, eye-catching holiday decoration.
The best part is that you can customize the colors to match your Christmas decor. Traditional red and gold, silver and blue, or an all-metallic combination can each give the wreath a different look.
Set aside about 45–60 minutes to assemble it, depending on how quickly you work and how much time you spend arranging the ornaments.
Materials
- 1 standard adult wire coat hanger
- 24 large plastic ornaments, about 2.36 inches each
- 20 medium plastic ornaments, about 1.57–1.77 inches each
- 16 small plastic ornaments, about 1.18 inches each
- 1 hot glue gun and 4 glue sticks
- 1 pair of needle-nose pliers
- 1 spool of ribbon, about 2.5 inches wide
- Scissors
Instructions
- Sort the ornaments. Separate them by size and color. Use shatterproof plastic ornaments to reduce the risk of breakage.
- Secure the ornament caps. Check that each cap is firmly attached. If needed, use a small amount of hot glue according to the glue gun’s instructions, taking care to avoid burns.
- Shape the hanger. Use needle-nose pliers to untwist the hanger neck and carefully bend the wire into a rough circle. Keep the hook intact for hanging.
- Thread the large ornaments. Slide the largest ornaments onto the wire, alternating colors to create an even pattern. Keep the caps facing inward where possible.
- Add the medium ornaments. Thread them onto the wire, filling spaces between the larger balls. Push the ornaments gently together as you work.
- Fill the gaps with small ornaments. Add the smallest ornaments to create a fuller appearance. Adjust their positions to balance the colors and shape.
- Close the wreath. Once all 60 ornaments are threaded, carefully reconnect the wire ends and secure the twist with pliers. Tuck away any sharp wire ends.
- Add the ribbon. Tie a generous bow around the joined section to cover the wire connection. Leave the hanger hook accessible at the back.
- Make final adjustments. Turn the ornaments as needed, fluff the ribbon, and check that the wreath hangs securely before displaying it.
Variations & Tips
- Traditional Christmas colors: Combine red, gold, and green for a classic holiday look.
- Winter-inspired colors: Try silver, white, and icy blue ornaments.
- Elegant metallics: Use gold, champagne, and silver for a coordinated finish.
- Choose lightweight materials: Plastic ornaments are generally easier to handle and less fragile than glass.
- Protect your door: Add a felt pad or ribbon behind the wire if it might scratch the door’s surface.
- Store carefully: Keep the wreath in a suitable wreath bag or sturdy box to help protect the ornaments between seasons.
Final Thoughts
This DIY Christmas ornament wreath is a creative way to turn inexpensive craft supplies into a festive seasonal decoration. Choose a color scheme you love, arrange the ornaments tightly, and finish with a ribbon that complements your holiday decor.
Safety tip: Use hot glue carefully, keep sharp wire ends tucked away, and make sure the wreath is securely supported when hanging.