My uncle taught me this trick to clear that dull grey tarnish off antique silver cake servers with 0 effort. Here’s how it works
How to Clean Antique Silver Cake Servers with Aluminum Foil and Baking Soda
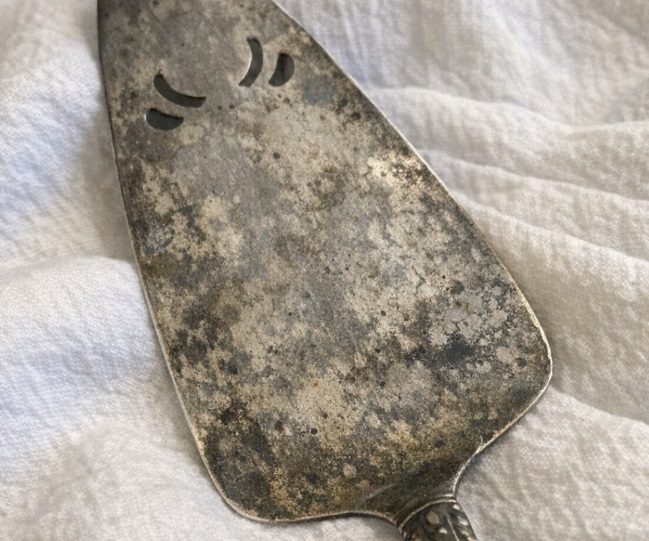
I still remember standing in my uncle’s kitchen, holding an old silver cake server that looked like it had seen better days. Its surface had turned a dull gray, and I honestly wondered whether it could ever look beautiful again. Then he showed me a simple cleaning trick that surprised me: no endless scrubbing, no expensive silver polish, and no spending an afternoon rubbing every little detail by hand.
Since then, I’ve come to appreciate this method for cleaning silver cake servers, pie knives, serving spoons, and other tarnished treasures picked up at antique shops or tucked away in family cabinets. It uses a few ordinary household supplies and can help remove tarnish with very little effort.
If you have silver serving pieces that only come out for birthdays, holiday dinners, or family gatherings, this guide will walk you through the process, explain what you need, and cover the precautions worth knowing before you begin.
1. What Causes That Dull Gray Tarnish?
That gray or black film on silver is usually tarnish, which forms when silver reacts with sulfur-containing compounds in the air. Over time, even pieces stored in a drawer or cabinet can develop a darkened appearance.
Humidity, storage conditions, and exposure to certain materials can influence how quickly tarnish develops. Silver cake servers that sit unused for months may gradually lose their shine, especially when they are not stored properly.
The good news is that surface tarnish can often be removed without aggressive scrubbing. The aluminum foil and baking soda method uses a chemical reaction to help transfer tarnish-related sulfur from the silver to the aluminum. This makes it an interesting alternative to conventional polishing, although it is not suitable for every antique silver piece.
2. The Simple Cleaning Method
The basic technique involves lining a heat-safe dish with aluminum foil, adding the silver item and baking soda, and pouring in very hot water. Under suitable conditions, the aluminum and silver participate in an electrochemical reaction that helps remove tarnish.
For one to three cake servers, a glass or ceramic baking dish is usually convenient. Line the bottom with a sheet of aluminum foil and arrange the silver so that it touches the foil directly.
Although some people recommend placing the shiny side of the foil upward, the important consideration is good contact between the aluminum and the silver. The method works best when the piece is suitable for this type of treatment and the materials are arranged properly.
3. What You Need Before You Start
Gather these supplies before beginning:
- 1 sheet of aluminum foil
- 1–2 tablespoons of baking soda
- Very hot water
- 1 heat-safe glass or ceramic bowl or dish
- Kitchen tongs or suitable heat-resistant gloves
- 1 soft cotton cloth or microfiber towel
- 1 soft toothbrush or cotton swab for small decorative details, if needed
For larger pieces, you can adjust the quantities according to the size of the dish and the amount of water needed. A standard cake server may fit in approximately 2–4 cups of water, provided the entire piece can be submerged safely.
Before cleaning, identify the material as carefully as possible. If the server has a fragile handle, decorative inlays, a special finish, or uncertain construction, consult a silver specialist before using a hot-water treatment.
4. Step-by-Step: How to Clean a Silver Cake Server
Step 1: Clean the surface first.
Wash the cake server gently with warm water and a small amount of mild dish soap to remove grease and food residue. Rinse it thoroughly. Avoid soaking pieces with glued handles or delicate decorative elements.
Step 2: Prepare the foil-lined dish.
Choose a heat-safe glass or ceramic dish large enough to hold the server. Line the bottom with aluminum foil and place the silver on top, making sure the two materials touch.
Step 3: Add the baking soda.
Sprinkle approximately one tablespoon of baking soda over the silver. The precise amount can vary with the size of the dish and the quantity of water used.
Step 4: Add the hot water carefully.
Pour in enough hot water to cover the appropriate parts of the piece. Take care to avoid splashes and burns. Very hot water can be dangerous, particularly when handling a long server or a heavy dish.
Step 5: Check the progress.
If the piece is known to be suitable for this method, inspect it frequently rather than automatically leaving it in the solution for an extended period. Some tarnish may begin to disappear within a few minutes, while heavier discoloration may require a different cleaning approach.
Step 6: Rinse and dry.
Remove the piece carefully with suitable utensils or heat protection. Rinse it thoroughly with clean water and dry it immediately using a soft cloth. Avoid rough rubbing, particularly on silver-plated surfaces.
If tarnish remains, do not assume that a longer or repeated soak is always better. For valuable, plated, or delicate pieces, seek advice on an appropriate silver-cleaning method before continuing.
5. Why This Method Can Be Easier Than Traditional Polishing
Traditional silver polishing usually involves applying a suitable silver polish and gently working it over the surface. Intricate patterns, engraved lettering, and decorative handles can make the process time-consuming.
The foil-and-baking-soda technique can reduce the amount of manual rubbing required because the tarnish-removal process relies on an electrochemical reaction rather than simply abrading the surface. For suitable items, this can make routine cleaning more convenient.
However, the method is not automatically safer or better than every silver polish. Some traditional polishes are designed for particular finishes, and removing tarnish may also remove darkened details that contribute to an antique piece’s appearance.
The best choice depends on the item’s age, construction, value, and desired finish.
6. Choosing the Right Bowl or Dish
Glass baking dishes, ceramic casserole dishes, and suitable heat-resistant bowls are convenient options for this cleaning technique. A larger rectangular dish may accommodate a long cake server and a matching pie knife more easily than a small, rounded bowl.
Avoid using a valuable metal pan or a container with a delicate coating. Make sure the dish can withstand the temperature of the water and that it is stable on the work surface.
Arrange the foil neatly along the bottom so the silver can make direct contact with it. If the server is too long to fit comfortably, choose a larger dish rather than bending or forcing the piece into position.
7. Should You Use Baking Soda Alone or Add Salt?
Baking soda is commonly used in this method, while some household instructions also recommend adding table salt. Both approaches are widely discussed in silver-cleaning advice, but adding more ingredients does not guarantee a better result.
For an item that is suitable for the process, start with a simple approach rather than experimenting with increasingly concentrated mixtures. Salt can increase the risk of corrosion under certain conditions, particularly if residues remain on the surface.
For valuable antiques, delicate silver plate, or pieces with uncertain materials, it is better to choose a cleaning method recommended by a qualified silver specialist instead of testing different combinations.
8. Which Silver Pieces May Benefit from This Method?
The technique is commonly used for plain silver items with ordinary surface tarnish, including:
- Silver cake servers
- Pie knives
- Serving spoons
- Pastry tongs
- Gravy ladles
- Butter knives
- Some silver-plated serving utensils
A tarnished serving piece from a family cabinet or a secondhand shop can sometimes look dramatically brighter after appropriate cleaning. Nevertheless, the method should not be used indiscriminately on every item labeled silver.
Silver-plated pieces have a thin layer of silver over another metal. Repeated cleaning and polishing can gradually wear that layer away, so gentle handling is especially important.
9. When You Should Avoid This Cleaning Trick
This is one of the most important things to understand before cleaning antique silver. Avoid the foil-and-hot-water method on pieces that contain materials or finishes that could be damaged by heat, water, or chemical reactions.
Use particular caution with items featuring:
- Glued or fragile handles
- Wood, ivory, or pearl components
- Enamel, lacquer, or decorative coatings
- Gemstones or other delicate inlays
- Mixed materials that have not been identified
- Valuable antique finishes that are meant to retain darkened details
Also avoid experimenting on rare, historically significant, or particularly valuable heirlooms. A professional conservator or reputable antique silver specialist can help determine the safest treatment.
When the material or finish is uncertain, it is better to pause than risk permanent damage.
10. What If Tarnish Remains in Decorative Patterns?
Sometimes a silver cake server looks brighter after cleaning but still has dark areas around engraved letters, floral patterns, or decorative grooves.
That remaining darkness may be tarnish, but it can also be intentional darkening used to emphasize the design. Removing it indiscriminately may change the appearance of an antique piece.
Start by examining the surface under good lighting. If the item is suitable for routine cleaning, a soft cloth and an appropriate silver-cleaning product may help with remaining surface discoloration. Avoid abrasive brushes, scouring pads, and aggressive scrubbing.
For intricate or valuable pieces, ask a specialist before trying repeated treatments. Preserving the original finish is often more important than making every groove uniformly bright.
11. How to Identify Silver Plate and Sterling Silver
Before choosing a cleaning method, turn the cake server over and inspect the back of the handle for markings.
Sterling silver is often stamped with terms such as Sterling or 925, indicating a silver content of 92.5%. Silver-plated pieces may carry marks such as EPNS or Silverplate, although markings vary by manufacturer and country.
A maker’s mark alone does not necessarily establish the silver content. If the markings are unclear, an antique dealer or qualified silver specialist may be able to help identify the piece.
Both sterling silver and silver plate can develop tarnish, but silver plate requires particular care because the underlying metal may become visible if the silver coating wears thin. If you notice yellow, copper, or brass-colored areas, avoid aggressive polishing and have the piece assessed before proceeding.
12. Why Rinsing and Drying Matter
After cleaning, rinse the server thoroughly with clean water to remove any remaining baking soda or cleaning solution. Pay attention to seams, engraved areas, and the junction between the blade and handle, where residue or moisture may collect.
Dry the piece immediately with a clean, soft cotton or microfiber cloth. Leaving water on silver can result in spots, particularly in areas with hard water.
For a final touch, gently buff the dry surface with a soft cloth if the finish permits it. Avoid excessive pressure, which can wear delicate plating or alter a fragile antique finish.
A careful rinse and thorough drying routine can help keep the piece looking its best after cleaning.
13. How to Slow Down Tarnish After Cleaning
Proper storage can help silver remain brighter for longer. Keep serving pieces in a dry environment and consider wrapping them in suitable anti-tarnish cloth or acid-free tissue.
Avoid storing silver directly against materials that may contribute to tarnishing, including rubber, wool, and certain papers or cardboard products. Anti-tarnish strips designed for silver storage may also help reduce exposure to tarnish-causing compounds.
If you only use your cake server for holidays, birthdays, or special occasions, inspect it occasionally instead of leaving it untouched for years. After each use, wash it according to the manufacturer’s recommendations and dry it thoroughly before putting it away.
Simple maintenance can make future cleaning easier and reduce the need for more intensive treatment.
14. A Simple Setup for Cleaning Before a Family Gathering
If you are preparing silver serving pieces before a birthday dinner or holiday gathering, organize a small cleaning area on the kitchen counter. Keep your heat-safe dish, cleaning supplies, rinsing area, and drying cloth within easy reach.
Work with one piece at a time when possible, especially if the items have different materials or finishes. This makes it easier to inspect each piece and avoid mixing up delicate items with ordinary serving utensils.
Keep children away from hot water and heated dishes throughout the process. Allow everything to cool before putting the supplies away, and make sure the finished silver is thoroughly rinsed and dried before it returns to the table.
A little organization can make preparing the serving pieces feel much less stressful when the rest of the kitchen is already busy.
15. The Best Rule: Start Gently and Protect the Silver
If there is one lesson worth remembering, it is that antique silver should never be cleaned aggressively just to achieve a mirror-like shine. A simple cleaning technique may work beautifully on one serving piece but be unsuitable for another.
Identify the material, check the finish, and choose a method appropriate for the item’s condition. The aluminum foil and baking soda technique can help remove tarnish from some suitable silver pieces, but it is not a universal solution for every antique or silver-plated object.
I still appreciate the little lesson my uncle shared with me: ordinary household supplies can sometimes make an overlooked treasure look lovely again. With the right precautions and a gentle approach, a family cake server can return to the table ready to serve another homemade cake, another holiday dessert, and another gathering worth remembering.